
OldBroomStreet came across a wonderful blog post by Cynthia Deis of Ornamentea, How to set up a booth for a craft show. We got her permission to share it with you.... enjoy!
How to set up a booth for a craft show
We had the Designer's Downtown Market here at Ornamentea this last weekend. It was fun, the weather was a bit cold to begin with but warmed up nicely. I enjoyed seeing everyone and bought some lovely gifts for family and friends including a scarf from Flamboyant Scarves that I wish I was keeping.
During this craft show season I get so many requests from customers for tips on setting up their booth at a craft show. While I do teach a class at Ornamentea called Crafting For Money that class doesn't go into great depth about booth set up. We just don't have time with all the other business details we have to talk about. With that in mind, here are my tips for making your booth work.
1. Bring enough product. There are two reasons to bring enough product. One reason is that a full booth looks more interesting to browsers and makes them want to see what you have. An empty booth looks picked-over or amateur or worse. You can fill up a booth just a bit with more props or signage, but product is what sells.
The second reason to bring enough product is economic-you want the show to be worth your time. How can you know if you have enough product to do a show? Think about it from a percentage standpoint. You will have a good show if you have a 30% sell through, a great show if you have a 40% sell through and a fantastic show if you have a 50% sell through. Anything over that is in the once-in-a-lifetime realm*. Keeping that in mind, look at the amount of product you are bringing and do the math. If you feel that the show will be worth your time if you sell $1000 worth of merchandise but you only bring $1500 worth than you are anticipating not just a fantastic show but a once-in-a-lifetime, quit-your-day job kind of show. Artists who do shows on a regular basis know that you need a full booth with lots of selection so you can make sales.
2. Create a line. Look at what you are selling. Do all the items look like they were made by the same person or do they look like the contents of fifteen different artist's studios? Yes, you need to experiment but not every experiment should make the show. Too many different crafts in too many different colors and shapes and sizes is just confusing. If shoppers can't decide if they want to come into your booth or just lie down with a towel over their eyes they will keep walking.
If you do create more than one grouping of work than keep them separated. Put your quilted pillows together on one table and your resin belt-buckles on another.
3. Define your space. If you are showing outside, get a tent. Inside or outside, get table coverings and use simple, repetitive props. Make sure folks know where your display ends and the other displays begin. I like rugs or other floor coverings if the show allows them and one of the simplest ideas I have ever seen was to use checkerboard squares of Contact paper on a concrete floor in an indoor show. The floor was eye-catching & cheap and at the end of the show the squares were peeled up and tossed out.
About props- I am a big fan of using props in a single color scheme and even a single shape if possible. Mixed up tables with cuff-links in a vintage pie plate, a crystal bowl of earrings and two different department-store looking necklace bars make me crazy. I get so distracted by the props I can barely concentrate on the artwork. Repeat shapes and colors and edit, edit, edit.
4. Communicate with your customers. Of course, you should talk to your customers (duh!) but you should also use signs to communicate with them. Do you take custom orders? Have free gift wrap? Ship? Have a website or etsy site? Do you teach classes or are you featured in a book? Make signs and put them in your booth. Print your signs out on a computer, use a large legible font and use all the same colored paper. Signs are props!
Do you have any booth display ideas you'd like to share? Post a comment here or email me...I'd love to pass them on.
*If you have had one or more of these 'once in a lifetime' shows than you, my friend, need to post some tips at the end of this column! Come on, share!
Showing posts with label How To. Show all posts
Showing posts with label How To. Show all posts
Friday, December 4, 2009


Friday, September 4, 2009
The Salty Cat Co. shares her knowledge
Lately, I've been browsing the blogs of team members, especially those who have encouraged readers to visit the team blog. It's always fun to see what others are up to.

The Salty Cat Co. seems to be having a ton fun creating tutorials to share her knowledge with the world through her blog. She's doing a great job with them, and has even been featured on Totally Tutorials! ::congratulations::
Stop by her blog to see what she's up to and learn how to make a few things too :)
Tuesday, December 23, 2008
Winter "How-To"
Another "how to" project for our readers... Snowmen! These snowboys (and snowgirls) are perfect as Christmas tree ornaments, present toppers, or even a little something extra to keep you smiling through out the winter months.
Round up!
First things first, collect the following supplies…
+ blown light bulb
+ felt scraps
+ buttons and/or beads
+ embroidery floss, yarn and/or thread (and needle)
+ scissors
+ paint (white, black, orange)
+ paint brushes
+ fabric glue

Stay warm with a Toboggan!
Create a tube by sewing together various felt scraps together. The stitches will be seen, but it’s not important to keep the stitches neat (it adds to the handmade nature of the craft).
As you piece the scraps together, measure them against the circumference of the light bulb for a snug fit. The goal is a tube which is twice as tall as the silver base of the light bulb.
If you’d like your snowman to be dressed to impress, you can add an extra snippet of felt, bead, or button to the front of what will soon be the front of the toboggan.
Put the finished tube on the light bulb and pull down to fully cover the silver base. Using a piece of embroidery floss, tie the tube closed just above the base.
Clip the felt at the top to create fringe and a fluffy top to the toboggan that you’ve just created.
.jpg) Snuggle up with a Scarf!
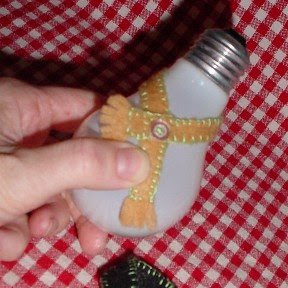
Snuggle up with a Scarf!
Cut a strip of felt that is approximately ½” wide by 8” long (you can also piece together felt to these measurements, if your scraps are smaller which will create a patchwork look).
Wrap the strip of felt around the “neck” of the bulb. Hold the scarf together where it over laps and remove from the bulb.
Sew the scarf together at the overlap point. You can also add a little pizzazz by adding an extra snippet of felt, bead, or button.
Clip the ends to create tiny fringe.
If you’re comfortable with the blanket stitch, you can add that stitch along the edges of the scarf that you’ve just created.
.jpg) Note: Any size light bulb will work; you’ll just need to adjust the “clothes” to fit your light bulb.
Note: Any size light bulb will work; you’ll just need to adjust the “clothes” to fit your light bulb.
.jpg) Feeling girlie?
Feeling girlie?
Gather up some embroidery or yarn scraps in the hair color of your choice.
Tie a knot at one end, then braid to the desired length and end with a knot of colored embroidery floss.
Repeat for the other pigtail..jpg)
Ready, set… paint snow!
Paint the light bulb white (usually takes 2 coats).
Wait for it to dry. Helpful hint: you can tie a string around the light’s base and hang it up to dry.
.jpg) Get bundled up!
Get bundled up!
Pull the scarf over the bulb’s socket.
Place fabric glue onto the underside the scarf and hold in place until it dries.
Put a small amount of glue on the socket and put on the toboggan—be sure to align the front of the hat with the scarf.
Finishing Touches!
Paint black dots for eyes, mouth, buttons…then a orange carrot nose.
.jpg)
Sit back and admire your latest creation!
First things first, collect the following supplies…
+ blown light bulb
+ felt scraps
+ buttons and/or beads
+ embroidery floss, yarn and/or thread (and needle)
+ scissors
+ paint (white, black, orange)
+ paint brushes
+ fabric glue
Stay warm with a Toboggan!
Create a tube by sewing together various felt scraps together. The stitches will be seen, but it’s not important to keep the stitches neat (it adds to the handmade nature of the craft).
As you piece the scraps together, measure them against the circumference of the light bulb for a snug fit. The goal is a tube which is twice as tall as the silver base of the light bulb.
If you’d like your snowman to be dressed to impress, you can add an extra snippet of felt, bead, or button to the front of what will soon be the front of the toboggan.
Put the finished tube on the light bulb and pull down to fully cover the silver base. Using a piece of embroidery floss, tie the tube closed just above the base.
Clip the felt at the top to create fringe and a fluffy top to the toboggan that you’ve just created.
Snuggle up with a Scarf!Cut a strip of felt that is approximately ½” wide by 8” long (you can also piece together felt to these measurements, if your scraps are smaller which will create a patchwork look).
Wrap the strip of felt around the “neck” of the bulb. Hold the scarf together where it over laps and remove from the bulb.
Sew the scarf together at the overlap point. You can also add a little pizzazz by adding an extra snippet of felt, bead, or button.
Clip the ends to create tiny fringe.
If you’re comfortable with the blanket stitch, you can add that stitch along the edges of the scarf that you’ve just created.
Note: Any size light bulb will work; you’ll just need to adjust the “clothes” to fit your light bulb. Feeling girlie?Gather up some embroidery or yarn scraps in the hair color of your choice.
Tie a knot at one end, then braid to the desired length and end with a knot of colored embroidery floss.
Repeat for the other pigtail.
Ready, set… paint snow!
Paint the light bulb white (usually takes 2 coats).
Wait for it to dry. Helpful hint: you can tie a string around the light’s base and hang it up to dry.
Get bundled up!Pull the scarf over the bulb’s socket.
Place fabric glue onto the underside the scarf and hold in place until it dries.
Put a small amount of glue on the socket and put on the toboggan—be sure to align the front of the hat with the scarf.
Finishing Touches!
Paint black dots for eyes, mouth, buttons…then a orange carrot nose.
Sit back and admire your latest creation!
Tutorial Submitted by DinnerTimeChimes
Tuesday, August 26, 2008
Etsy Treasury: Part 2 of 3
This article is the 2nd in a three-part series on creating an Etsy Treasury.
For some, the process of creating a Treasury might seem a bit daunting. We’ve seen several comments on how challenging it can be to get an open spot, but we’ve also seen several tips from team members and the Storque on not only “snagging” a Treasury but how to make it eye-catching, memorable and most importantly “HOT”! We decided to compile all of this helpful information here, to shed some light on this whole process, thereby making it easier for you to know the joy of getting your 1st Treasury.
In our experience it’s probably best to create a title and a draft list before your Treasury spot becomes available. Once you type the title in the live Treasury, it can not be changed so think carefully!
The Poster Sketch. For those who like a sneak peek at how their finished list will appear, Etsy developed this excellent tool which allows you to design a “draft” Treasury before you layout your actual one. It’s great because you have as much time as you like to get the exact theme, color combinations and positions for your items without any pressure. To fill in your test list, click edit next to a box and enter an item number. Click ok to enter that item into the box. You can drag boxes around to swap out their positions. Once you acquire a Treasury spot, you simply copy and paste your item numbers in the item id box of the live Treasury and you’re done!
How do you actually get a treasury?
Step 1: Enter the Treasury.
Step 2: Look in the upper left portion of your screen. Find the number of lists that are currently in the Treasury. IF THAT NUMBER IS LESS THAN 333:
 A cool feature is the ability to edit your list whenever you like--you can move items around by clicking and dragging to the new location and adding new items too.

 The Treasury is full and will not allow you to create a new list. You must wait for enough lists to expire so the number falls below 333.
Step 3: As soon as you see the box appear at the bottom of your screen, click inside so that you see your cursor blinking. You should have a list. Now, type in your title.
How to Snag a Treasury: Part II in this series covers the how-to of creating a Treasury list.
For some, the process of creating a Treasury might seem a bit daunting. We’ve seen several comments on how challenging it can be to get an open spot, but we’ve also seen several tips from team members and the Storque on not only “snagging” a Treasury but how to make it eye-catching, memorable and most importantly “HOT”! We decided to compile all of this helpful information here, to shed some light on this whole process, thereby making it easier for you to know the joy of getting your 1st Treasury.
In our experience it’s probably best to create a title and a draft list before your Treasury spot becomes available. Once you type the title in the live Treasury, it can not be changed so think carefully!
Your Treasury will be created with either items from your favorites or a search you’ve done on Etsy that matches whatever theme you’ve chosen for your list, such as picks from your Street Team(s), specific color (s) or based on a mood, favorite saying, utility of the items or even the materials (recycled, natural etc.). For example, I recently posted a list with items drawn from a search under Handmade items, tags, title and descriptions for “NCTriangle and blue”. You can record the item numbers from your search in a word document until a Treasury spot becomes available.
The Poster Sketch. For those who like a sneak peek at how their finished list will appear, Etsy developed this excellent tool which allows you to design a “draft” Treasury before you layout your actual one. It’s great because you have as much time as you like to get the exact theme, color combinations and positions for your items without any pressure. To fill in your test list, click edit next to a box and enter an item number. Click ok to enter that item into the box. You can drag boxes around to swap out their positions. Once you acquire a Treasury spot, you simply copy and paste your item numbers in the item id box of the live Treasury and you’re done!
How do you actually get a treasury?
Step 1: Enter the Treasury.
Step 2: Look in the upper left portion of your screen. Find the number of lists that are currently in the Treasury.
IF THAT NUMBER IS LESS THAN 333:Step 3: Scroll to the bottom of the page. You will see a box at the bottom where you may type in the title for your Treasury List.  Once you click Create to acquire a Treasury spot, a blank treasury will appear.
Once you click Create to acquire a Treasury spot, a blank treasury will appear. Now you can simply copy and paste your item numbers from the Poster Sketch or your Word document in the item id box of the live Treasury! There are twelve main boxes, with four alternates to the right. Be sure to select items for all boxes, so that your treasury has a better chance of appearing on Etsy's front page.
A cool feature is the ability to edit your list whenever you like--you can move items around by clicking and dragging to the new location and adding new items too.IF THAT NUMBER IS MORE THAN 333:
The Treasury is full and will not allow you to create a new list. You must wait for enough lists to expire so the number falls below 333. How will you know when there will be less than 333 treasuries?
Step 1: Sort the lists by "expiration" (click on the "expiration" tab).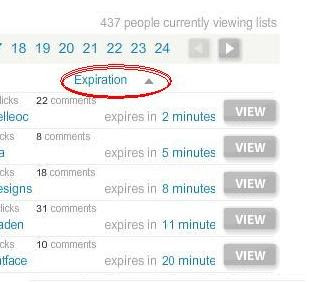
Step 2: Count from the first page with the lists that will expire first and count by pages, there are 20 treasuries on a page, to find out when the 333rd list will expire.
We also recommend returning to the list with at least 30 minutes left because people delete treasuries and sometimes it reaches 333 faster.
**To avoid losing an available spot, DO NOT REFRESH THE PAGE AS YOU ARE WAITING FOR IT TO OPEN" The page will refresh itself.
Step 3: As soon as you see the box appear at the bottom of your screen, click inside so that you see your cursor blinking. You should have a list. Now, type in your title.
**It’s best if you come up with a title beforehand to save time and avoid embarassing typos!
A few things to remember about the Treasury:
- You get to have one active list at a time (one regular treasury and one Treasury West, if you choose)
- Lists expire anywhere from one to three days
- There is a maximum of 333* total active lists allowed at one time (that number is 222 for "test" sever treasury, Treasury West).
- Your list can be edited as many times as you like
- All added items must be actively listed for sale, not already sold
- The Treasury is not intended for self-promotion.
- If you’d like to convo sellers that are in the Treasury without spamming, avoid sending mass convos with the same subject line! Remember, you can always post the link to your list on our forum to notify sellers. I know I always enjoy the surprise of finding out on my own that I’ve been featured!
- You get to have one active list at a time (one regular treasury and one Treasury West, if you choose)
- Lists expire anywhere from one to three days
- There is a maximum of 333* total active lists allowed at one time (that number is 222 for "test" sever treasury, Treasury West).
- Your list can be edited as many times as you like
- All added items must be actively listed for sale, not already sold
- The Treasury is not intended for self-promotion.
- If you’d like to convo sellers that are in the Treasury without spamming, avoid sending mass convos with the same subject line! Remember, you can always post the link to your list on our forum to notify sellers. I know I always enjoy the surprise of finding out on my own that I’ve been featured!
- You can customize your List by editing the title, subtitle and location (linkable).

What do all the stars mean?
Blue stars: This indicates that you are the curator of the list

Blue stars: This indicates that you are the curator of the list
Gold stars: This indicates that one of your items is included in a list (item is visible to the public)


Silver stars: This indicates that one of your items is an alternate in a list (item is visible only to the curator)
For answers to FAQ about treasury lists, see the Storque!
Check out the last part in our series, “Having Fun Choosing the Right Kind of Treasury” coming soon.
Tuesday, August 12, 2008
Etsy Treasury: Part 1 of 3
This article is the 1st in a three-part series on creating an Etsy Treasury.
What's the "Treasury" you ask?
According to the Storque, The Treasury is a member-curated gallery of short-lived lists of 12 hand-picked items each (plus four alternates). It functions as a high-demand (and pretty!) promotional tool that many devoted Etsians fight to get. Members can feature their favorite items, items selected on a theme, or the work of affiliated Etsy Street Teams. The Treasury is not intended for self-promotion, but instead to acknowledge and share the many cool things for sale on Etsy.
 Etsy Admin often choose an exceptional Treasury list to promote on the home page and occasionally make them to tie into Storque articles or special events and occasions.
How can you help? The more views and clicks a Treasury receives, “the hotter this list grows”, improving the chance of landing a front page. So, if a fellow team member posts a Treasury, be sure to check it out, leave a comment and click through all of the items on the page! Our team forum even has a dedicated place to post the link to a Treasury you create, so be sure to spread the word.

The less competitive and experimental Treasury West affords another venue to highlight your favorites but it receives less visibility and is subject to removal at any time.
Maybe you're like us and had been wondering how do certain Treasury lists make it to Etsy's front page? The next article in our series will focus on tips for creating a memorable Treasury.
--A special thanks to CinnamonSpice & LynnsCrafts for writing this series for us!
What's the "Treasury" you ask?
According to the Storque, The Treasury is a member-curated gallery of short-lived lists of 12 hand-picked items each (plus four alternates). It functions as a high-demand (and pretty!) promotional tool that many devoted Etsians fight to get. Members can feature their favorite items, items selected on a theme, or the work of affiliated Etsy Street Teams. The Treasury is not intended for self-promotion, but instead to acknowledge and share the many cool things for sale on Etsy.
Etsy Admin often choose an exceptional Treasury list to promote on the home page and occasionally make them to tie into Storque articles or special events and occasions.How can you help? The more views and clicks a Treasury receives, “the hotter this list grows”, improving the chance of landing a front page. So, if a fellow team member posts a Treasury, be sure to check it out, leave a comment and click through all of the items on the page! Our team forum even has a dedicated place to post the link to a Treasury you create, so be sure to spread the word.
The less competitive and experimental Treasury West affords another venue to highlight your favorites but it receives less visibility and is subject to removal at any time.
Maybe you're like us and had been wondering how do certain Treasury lists make it to Etsy's front page? The next article in our series will focus on tips for creating a memorable Treasury.
--A special thanks to CinnamonSpice & LynnsCrafts for writing this series for us!
Thursday, August 7, 2008
HOW TO: Turning fabric scraps into a patchwork drawstring bag
This is a guest blog by Joei Reed of Joei Reed Hats for Etsy's NC Triangle Street Team blog
During any sewing project, one ends up with pieces of fabric that are too small to be useful, but big enough that it seems a shame to throw them away. And piled up together, the scraps add up to a pretty sizable amount of material. What to do with these wayward pieces? One thing that I like to do is create a patchwork drawstring purse or bag. It gives you a bag that coordinates with whatever you're making from the fabric, and it creates something striking from those seemingly "useless" little pieces.
The process is pretty simple. First collect your small pieces. Here's a set of scraps left over from a hat I covered recently. (You will probably find yourself saving all kinds of small pieces if you start making these sorts of projects):
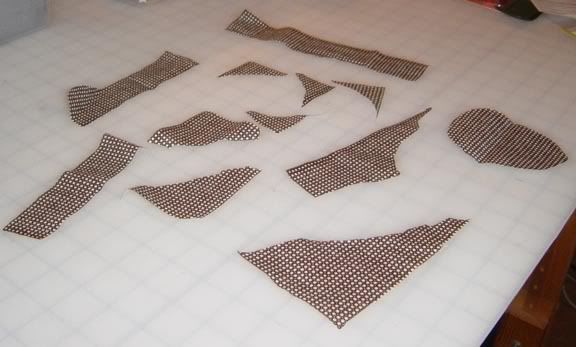
Figure out how to lay out your pieces so they fill in a rectangle/square, or even a circle. (The instructions here apply to square bags, but circular bags are not too dissimilar.) It's okay if your pieces overlap, just try not to leave gaps larger than about a quarter of an inch.
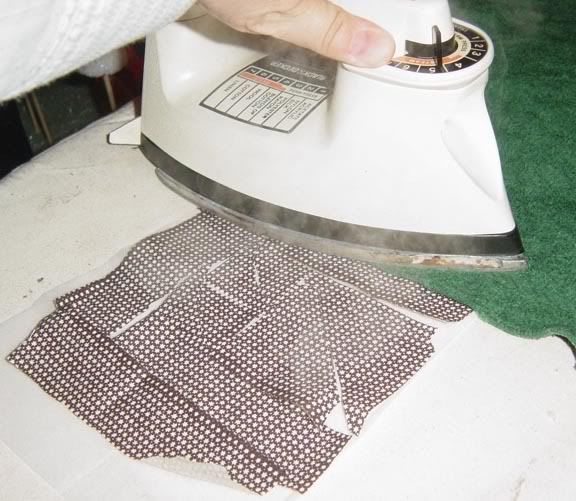
Cut a piece of fusible interfacing the side of your pieced-together shape, and place your fabric on it, with the fusible side towards the fabric. Fuse it to your fabric following the instructions that come with the interfacing. This usually involves an iron on a wool setting and a damp presscloth.
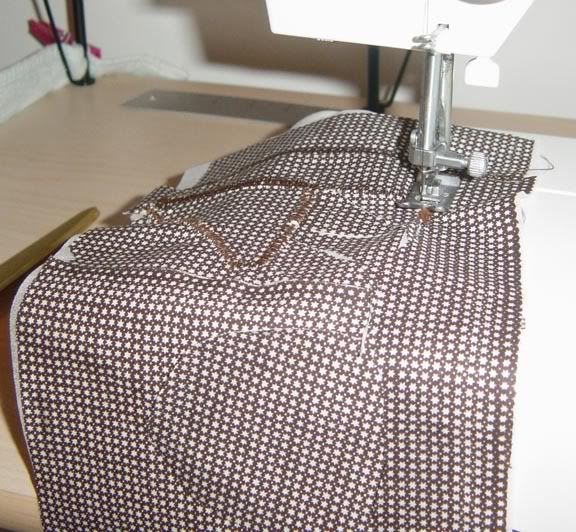
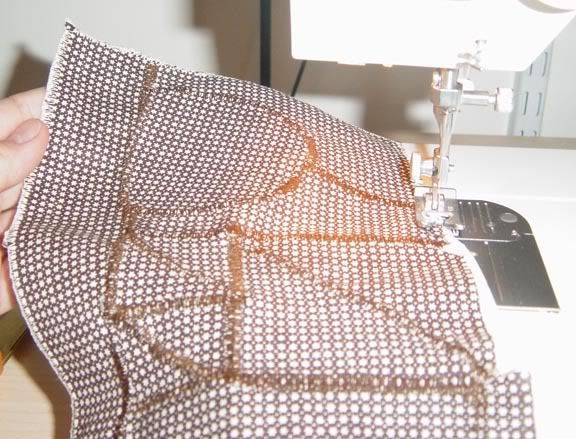
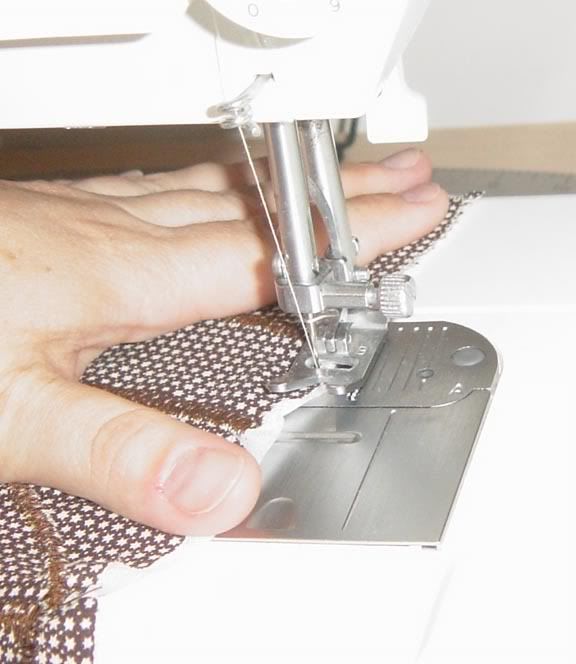
Your fabric will now be stuck down to the interfacing, so your little pieces will stay in place. Next set your sewing machine to its widest zigzag stitch setting, and a short stitch length, usually around 1. Zigzag stitch over all of your edges of all of the pieces. It's okay to go over some edges more than once if you need to, in order to not have to start new lines of stitching. You can use a coordinating thread color, as I did here, or you can use a contrasting one to play up your patchworking.

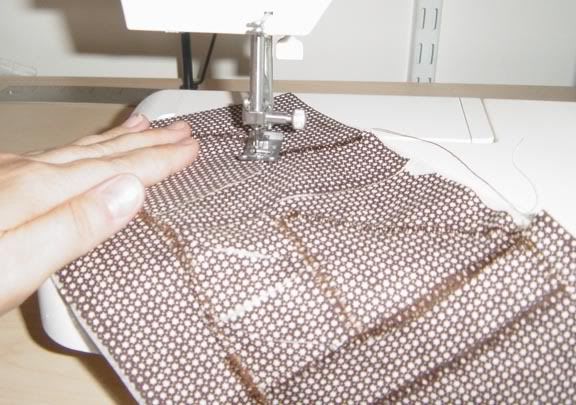
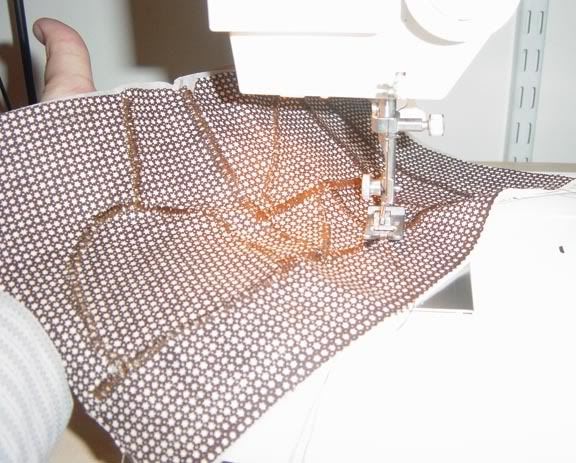
Once you have finished your zigzag stitching over the surface of the fabric, use the same stitch to overcast the entire edge of the piece. This is done by zigzag stitching off of the edge of the fabric, so it locks the edge in stitching and it won't fray.
You'll probably want to press your finished piece.

So here's what the finished piece looks like.
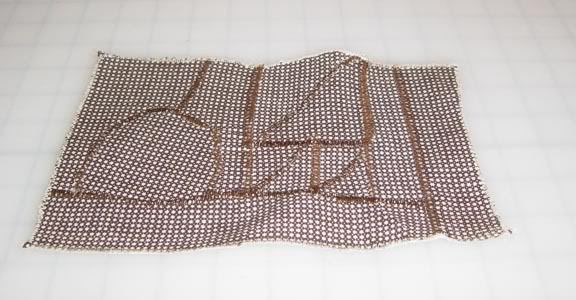
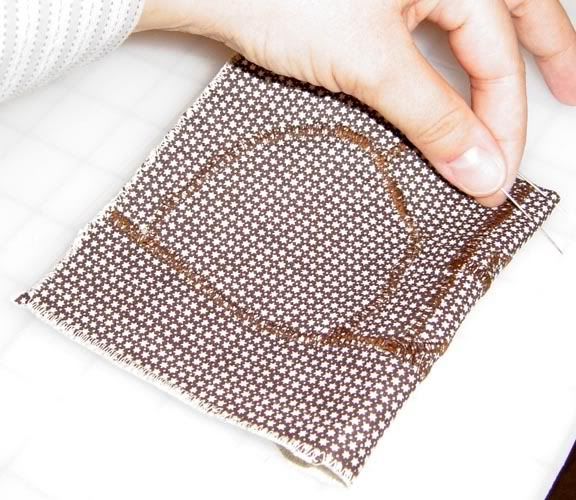
At this point you can back the piece with another piece of fabric the same size (another patchwork piece, if you like) or you can fold the patchwork piece in half to make the bag. In this case I was making a smaller bag so I folded it. So to figure out the size of your final bag, fold it in half and fold over about an inch or so of fabric at the top (depending on the size of the drawstring you will use).
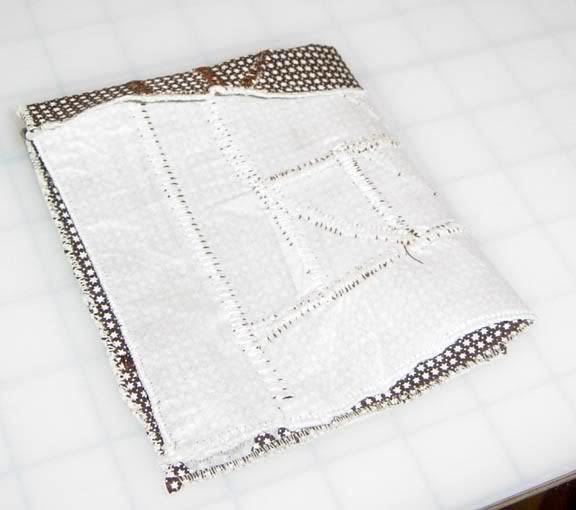
To make a hole for the drawstring on the folded side, mark the folded location with pins and make a small buttonhole that is slightly shorter than your casing length.
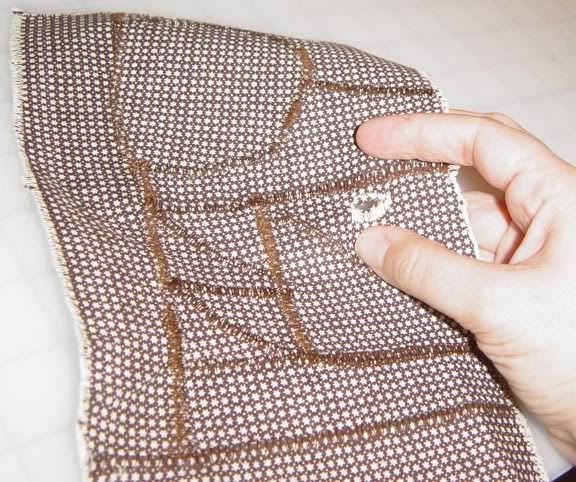
(You can skip the buttonhole step if you are not making a folded bag. Just do both sides as indicated below.)
Fold your bag back in half, inside out, and pin the open sides together, stopping just a little bit above where the top foldover (which will make the drawstring casing) will attach to the rest of the bag.
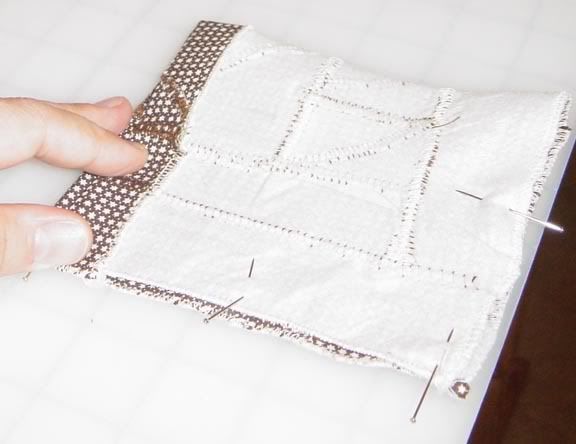
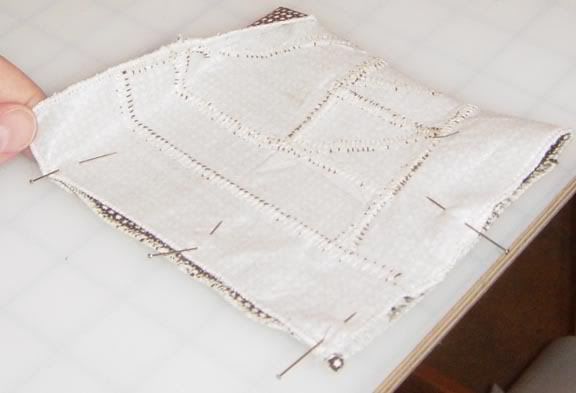
Sew on the two open sides, again stopping where you pinned at the top.
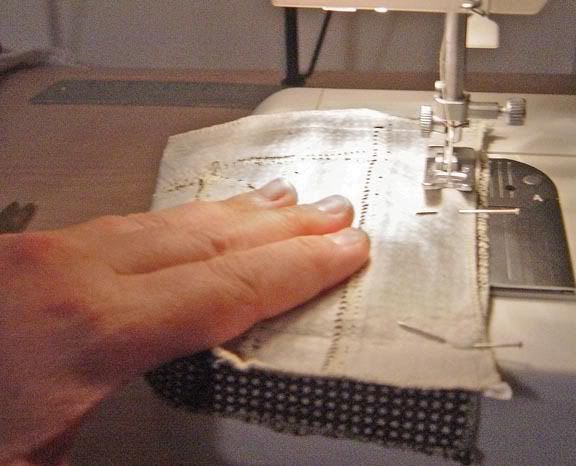
Fold down the casing and stitch, being careful to sew only through one layer of fabric! If you sew through both sides, you'll sew your bag shut!
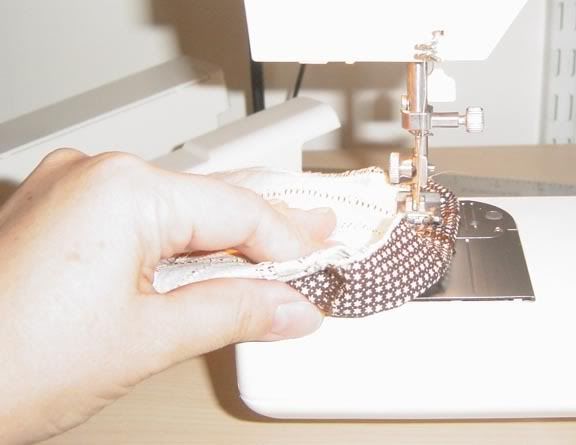
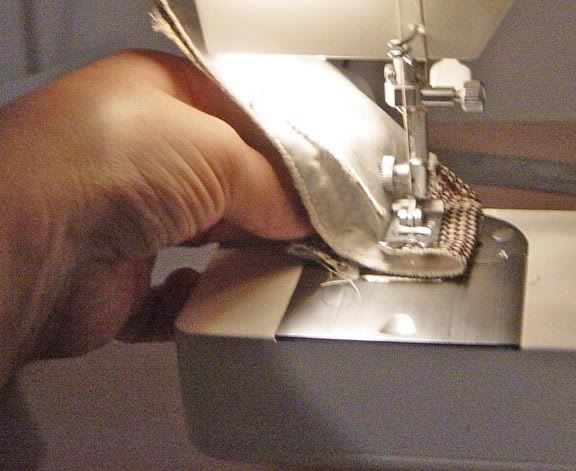
Turn your bag right side out and press, and then turn the seam allowance to the outside just at the top on the stitched edge to create the opening for the casing. You may need to stitch it a couple of times to hold it in place.
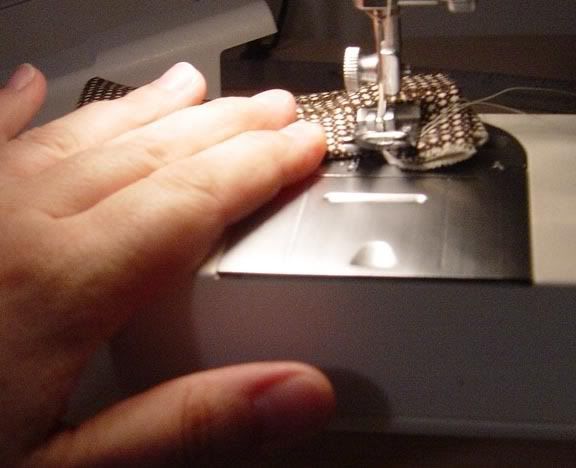
To create the drawstring, cut two lengths of a ribbon or cord to about three times the width of your bag, and attach one to a safety pin.
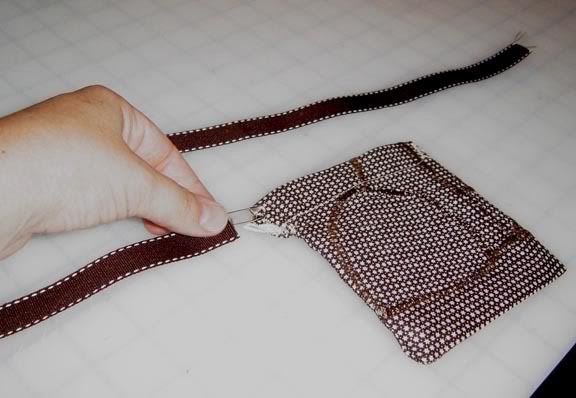
Thread it through the casing opening on one side, all the way around the top of the bag, and back out the other opening on the same side that you started.
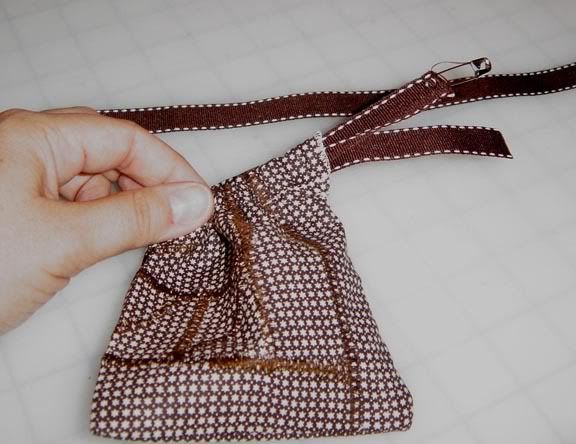
Repeat for the other side of the casing.
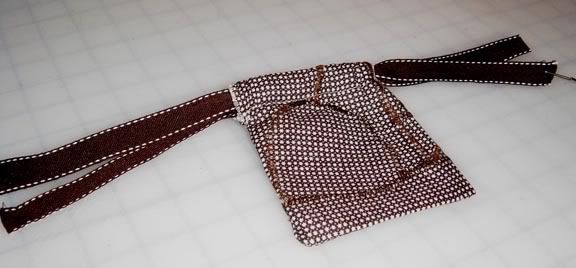
Knot the ends of your cords, and your bag is finished!
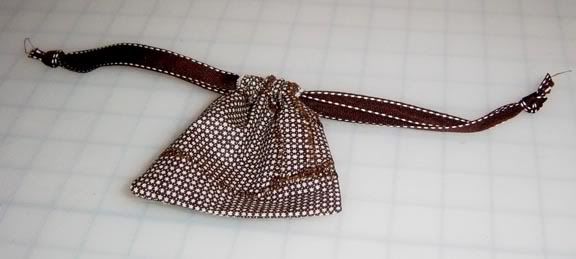
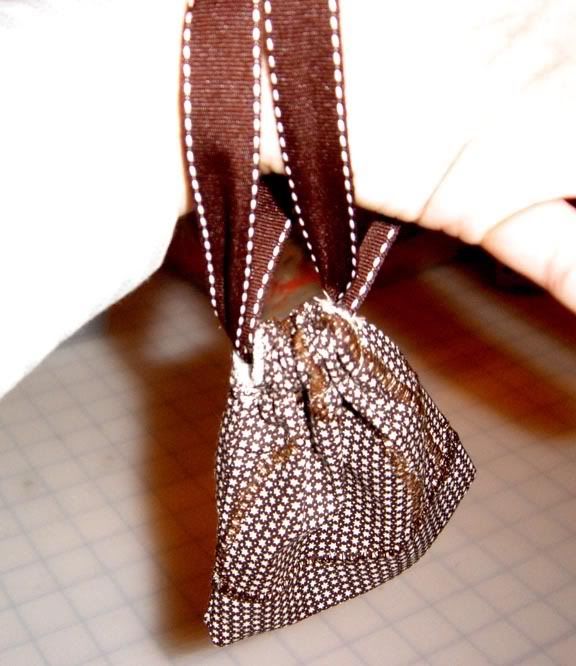
Here are some other patchwork bags I've created over the years. In one I made an effort to line up the pieces so they had the same pattern as the original material. In other projects the stitching becomes part of the design.

Once you have your piece patchworked, you can of course use it for other things than drawstring bags. You can create other purse layouts, or if you have larger patchwork pieces, they can be made into a shawl, for instance.
I hope this easy and quick project will give you something fun and rewarding to do with your leftover pieces!
--Many thanks to Joei for sharing this project how-to with us!
During any sewing project, one ends up with pieces of fabric that are too small to be useful, but big enough that it seems a shame to throw them away. And piled up together, the scraps add up to a pretty sizable amount of material. What to do with these wayward pieces? One thing that I like to do is create a patchwork drawstring purse or bag. It gives you a bag that coordinates with whatever you're making from the fabric, and it creates something striking from those seemingly "useless" little pieces.
The process is pretty simple. First collect your small pieces. Here's a set of scraps left over from a hat I covered recently. (You will probably find yourself saving all kinds of small pieces if you start making these sorts of projects):
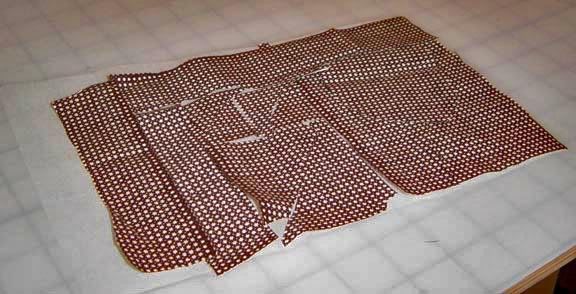
Figure out how to lay out your pieces so they fill in a rectangle/square, or even a circle. (The instructions here apply to square bags, but circular bags are not too dissimilar.) It's okay if your pieces overlap, just try not to leave gaps larger than about a quarter of an inch.
Cut a piece of fusible interfacing the side of your pieced-together shape, and place your fabric on it, with the fusible side towards the fabric. Fuse it to your fabric following the instructions that come with the interfacing. This usually involves an iron on a wool setting and a damp presscloth.
Your fabric will now be stuck down to the interfacing, so your little pieces will stay in place. Next set your sewing machine to its widest zigzag stitch setting, and a short stitch length, usually around 1. Zigzag stitch over all of your edges of all of the pieces. It's okay to go over some edges more than once if you need to, in order to not have to start new lines of stitching. You can use a coordinating thread color, as I did here, or you can use a contrasting one to play up your patchworking.
Once you have finished your zigzag stitching over the surface of the fabric, use the same stitch to overcast the entire edge of the piece. This is done by zigzag stitching off of the edge of the fabric, so it locks the edge in stitching and it won't fray.
You'll probably want to press your finished piece.
So here's what the finished piece looks like.
At this point you can back the piece with another piece of fabric the same size (another patchwork piece, if you like) or you can fold the patchwork piece in half to make the bag. In this case I was making a smaller bag so I folded it. So to figure out the size of your final bag, fold it in half and fold over about an inch or so of fabric at the top (depending on the size of the drawstring you will use).
To make a hole for the drawstring on the folded side, mark the folded location with pins and make a small buttonhole that is slightly shorter than your casing length.
(You can skip the buttonhole step if you are not making a folded bag. Just do both sides as indicated below.)
Fold your bag back in half, inside out, and pin the open sides together, stopping just a little bit above where the top foldover (which will make the drawstring casing) will attach to the rest of the bag.
Sew on the two open sides, again stopping where you pinned at the top.
Fold down the casing and stitch, being careful to sew only through one layer of fabric! If you sew through both sides, you'll sew your bag shut!
Turn your bag right side out and press, and then turn the seam allowance to the outside just at the top on the stitched edge to create the opening for the casing. You may need to stitch it a couple of times to hold it in place.
To create the drawstring, cut two lengths of a ribbon or cord to about three times the width of your bag, and attach one to a safety pin.
Thread it through the casing opening on one side, all the way around the top of the bag, and back out the other opening on the same side that you started.
Repeat for the other side of the casing.
Knot the ends of your cords, and your bag is finished!
Here are some other patchwork bags I've created over the years. In one I made an effort to line up the pieces so they had the same pattern as the original material. In other projects the stitching becomes part of the design.
Once you have your piece patchworked, you can of course use it for other things than drawstring bags. You can create other purse layouts, or if you have larger patchwork pieces, they can be made into a shawl, for instance.
I hope this easy and quick project will give you something fun and rewarding to do with your leftover pieces!
--Many thanks to Joei for sharing this project how-to with us!
Subscribe to:
Posts (Atom)
